and other tales from the garage
First job of the day is removing the left brake calliper ready to strip it down. I was also intending to clean up both callipers but decided against it for the moment. Instead I removed the nosecone.
This meant first removing the mirrors (two bolts easy) and
the indicators. One undid easily, the other required a soaking in Duck Oil for
a while to loosen the bolt. Next, I tried to remove the screen, but found all
but two of the allen bolts were stuck solid. I did have to remove two of the
screen fixing bolts but luckily, these were the two that undid easily. Another
couple of bolts holding the nosecone to the mounting frame, disconnect the
headlight and it was free.
Once on the bench, I managed to remove all the screen bolts
bar one with an allen key & a pair of pliers. The final one, I had to cut
the rubber away so I could push the screen nut through the fairing. After that,
it was down to mole grips to remove the bolt/nut from the screen. Once again, a
hoover to remove all trace of spider then a good clean with #Muc-Off.
The front mudguard was a similar affair, all but one of the bolts came undone easily, the last one needed persuasion with mole grips again. Luckily, there was no damage to the mudguard and despite there being a lot of oil around where it attached to the shock, it was in just as good a condition as the rest of the bodywork once cleaned up.
 |
| Mudguard still attached |
Next on my list of jobs today was to remove the mounting frame that the nose cone attaches to. There were many cable ties to cut first (from memory I think around 8) and I had to disconnect a couple of parts of the wiring loom. There are 4 bolts holding the mounting frame to the bike, two to the headstock and one to each side of the radiator mounting points. All came off with little problem, although I did have to undo the wheel clamp & turn the front wheel a bit to gain access to the bolts on the headstock.
Again, once removed, I gave it a good clean and all the
panels together with the mounting frame are now in the loft in the garage.
Now to the next bit of cleaning. I used Autosol to give the
exhaust end cans a bit of a polish, which cleaned up nicely. A little more work
& I think they’ll do, aside from the scratches down the right side of the
end can. They’re too deep to do anything with but they’re serviceable. I may consider aftermarket exhausts in the long term but for recomissioning, they'll do just fine.
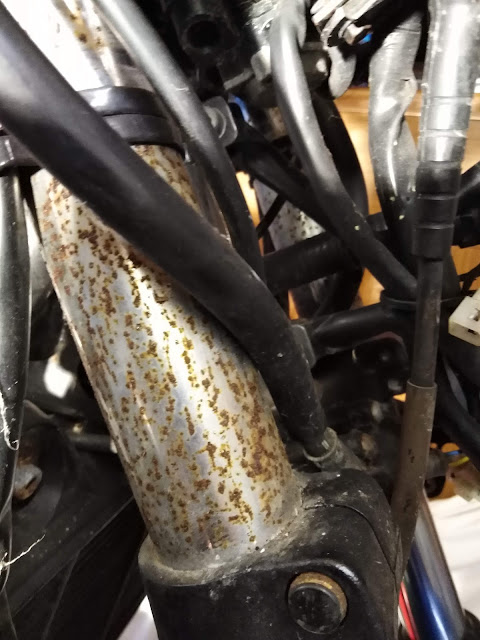
That’s more than I can say about the fork stanchions. They’re both corroded pretty much from top down to the dust seals, which is why the oil seals leak, I guess. Autosol is definitely not going to solve this one. They’re either going to need replacing or re-chroming.


Comments
Post a Comment